Pages

Showing posts with label 3pp. Show all posts

Thursday, January 2, 2014

Banana Bread Bites

Portion control is REALLY important to being successful!  This recipe is perfect for helping you practice good portion control.  I took a tradtional banana bread and sliced it like usual, but then cut each slice into perfect, bite-sized pieces!  You could serve this for house guests with some fresh fruit for a healthy, low pp breakfast.

Servings:  16 (Assuming 1 regular loaf cut into 8 slices)
Serving Size: 3 banana bites
Points Plus: 3pp
Prep Time: 20 minutes
Cook/Bake Time: 55-60 minutes
Rating: 4 stars - Very Good

Ingredients:
1/2 cup butter
1 cup sugar
2 eggs
1 tsp. baking soda
2 cups all-purpose flour
1/4 tsp. salt
1 cup ripe bananas, mashed
3/4 cup walnuts, chopped
Cooking spray

Directions:
Preheat the oven to 350 degrees.  In a medium bowl, combine the baking soda, flour and salt making sure it's well combined.  In a large bowl, mix together the butter, sugar and eggs.  Add half the flour mixture to the wet ingredients, followed by half of the mashed bananas; stirring until well combined after each addition.  Repeat with the remaining flour and banana mixtures.  Gently fold in the walnuts with a spatula.  Lightly grease a loaf pan with cooking spray.  Bake for 55-60 minutes or until a toothpick will come out clean.  Allow the bread to cool on a wire rack.  Cut each slice of banana bread into 6 bite-sized pieces to get the pp value above.

Tip:
This recipe will make one regular sized loaf and 2 mini loaves.  Another good tip for portion control is to freeze half of what you make so you aren't eating the full recipe at one time.  Banana bread freezes really well AND it will save you time next time you have company coming into town!

XOXO Megan

Thursday, December 26, 2013

Champagne with Cranberry Skewers

This holiday cocktail is perfect for Christmas!  The cranberries give a pop of color to your glass of champagne and are sure to put you in the holiday spirit. These could easily be served at a New Year's Eve party as well.

Servings: 4
Size: 1 4 oz. glass of champagne
Points Plus: 3pp
Level of Difficulty: Easy
Prep Time: 1 hour plus for freezing
Cook Time: n/a
Rating: 4 stars - Very Good

Ingredient List:
1 bottle of champagne
24 cranberries
Wooden skewers

Directions:
Pierce a skewer with cranberries and layer until you have 6 berries on the skewer.  Repeat to make a total of 4 cranberry skewers.  Place in the freezer for at least an hour to allow the berries to freeze.  Serve champagne and place one skewer per glass for a festive holiday cocktail!

Tip:
Limit yourself on these champagne cocktails to avoid a 'champagne headache' the next day. :)

XOXO Megan

Monday, December 16, 2013

Peanut Butter Kisses

We wanted to share some of our FAVORITE Christmas cookies with you this week!  I know that Christmas cookies are not necessarily healthy or low in pp, BUT it is important for you to know how many pp you are eating if you do give in and have a cookie or two over the holiday season!

That said, this is one of my absolute favorite Christmas cookies!  These cookies have always topped the list when my family gets together to bake holiday cookies.  I’m sure you’ve had some variation of this recipe at some point, but like I said earlier, now you know how many pp each peanut butter kiss cookie is!!
Servings:  Recipe will make 3 dozen
Size:  1 cookie
Points Plus: 3pp
Level of Difficulty:  Easy
Prep Time: 10 minutes
Bake Time:  12-15 minutes
Rating: 5 stars – Excellent

Ingredient List:
4 Tbsp. butter
4 Tbsp. shortening
¾ cup peanut butter
½ cup sugar
½ cup brown sugar
1 ½ Tbsp. vegetable oil
1 egg
1 ½ cups flour
½ tsp. baking soda
Hershey kisses

Directions:
Preheat the oven to 350°. Lightly grease your cookie sheets.  In a medium bowl, cream butter, shortening, peanut butter and sugars until well mixed.  Stir in the oil and egg.  Add flour and baking soda.  Stir until just combined.  Roll into balls and then roll in sugar before baking.  Bake for 12-15 minutes.  Transfer to a wire cooling rack immediately after they come out of the oven and gently press a chocolate kiss in the middle of each cookie to flatten. 
Tip:
Make sure you un-wrap all your Hershey kisses and place in small bowl ahead of time!  Once your cookies are out of the oven you will want to work quickly to place a kiss in the middle of each cookie.
XOXO Megan

Tuesday, December 10, 2013

Tortilla Pinwheels

These are a quick and easy holiday appetizer that will definitely be popular at your holiday party!  A good way to make these look more festive is to use spinach or tomato tortillas instead of plain ones - they you can serve a variety of red and green pinwheels!  My picture below shows plain tortillas, I couldn't find the other varieties at the store.

Servings:  25
Size:  2 pinwheels
Points Plus: 3pp
Level of Difficulty:  Easy
Prep Time: 15 minutes (Refrigerate overnight or for a few hours before serving)
Cook Time: n/a
Rating:  4 stars – Very Good

Ingredient List:
8 oz. cream cheese, 1/3 less fat (softened)
8 oz. sour cream, light
1 can (4 oz.) green chilies, chopped and drained
1 can (4 oz.) black olives, chopped and drained
1 cup reduced-fat cheddar cheese, shredded
½ cup green onions, chopped
Garlic powder to taste
5 flour tortillas (10 inch)

Directions:
In a medium bowl, combine cream cheese, sour cream, chilies, olives, cheddar cheese, garlic powder and stir until well combined – make sure the cream cheese is softened before you start this as it makes it much easier to mix in.  Spread a light coating of the filling mixture onto the tortilla.  Beginning on one side, begin to tightly roll the tortilla into a pinwheel, trying to make it as tight as possible.  This can be a little tricky, but you’ll get the hang of it after a few.  Wrap each tortilla in plastic wrap and refrigerate ideally overnight or a good 2-3 hours should be enough time.  Just before serving, remove the pinwheels from the fridge and slice on a cutting board.  Make sure to cut off the ends (these will be only partially filled anyways).  Use a knife to cut each tortilla into ½ inch pinwheel slices and arrange on a serving tray or platter.  A sharp knife works best since it allows you to cut without smashing the pinwheels too much.
Tip:
Only spread the filling mixture over two-thirds of the tortilla.  As you roll up the tortilla, the filling will overflow to fill the remaining one-third section.  Practice makes perfect!  Your first tortilla might not be your best. :)
XOXO Megan

Monday, December 9, 2013

Polenta Pepperoni Pizza

Hello everyone!  As you know it is that busy time of year, where food and drinks are the focus and you are too busy to do anything, let alone meal planning!  I don’t know about you but I ate way too many holiday goodies this past weekend (including more pieces of homemade fudge than I care to admit – recipe coming next week)! Are you hosting any holiday get-togethers?  Megan and I thought it would be fun to feature some easy and healthy holiday inspired appetizer ideas this week to make your party planning a breeze.  One of the most popular posts on EAT ME is for our mini polenta pizzas.  I thought I would do a twist on these by making them Christmas colored (red, green and white!) and adding meat.  They turned out really tasty – enjoy!  Also they are extremely easy.  Make these for your holiday party – people will be impressed people!

Servings: 12
Serving Size: 2 polenta pizzas
Points Plus: 3pp
Level of Difficulty: Easy
Prep Time: 10 minutes
Cook Time: 45 minutes
Rating: 5 stars - Excellent

Ingredient List
1 log of polenta
12 pieces turkey pepperoni
1 cup marinara sauce
¼ cup fat free feta
1 cup arugula, chopped
Italian seasoning
Cooking spray

Instructions
Pre-heat your oven to 400 degrees. Cut polenta log into 12 equal rounds. Lay the rounds on a baking tray and spray them with cooking spray. Bake for 20 minutes.  Remove tray from oven, flip rounds, and layer with toppings, starting with about 1 T. of sauce, then 1 turkey pepperoni, about 1 T. of raw arugula, about 1 t. of feta and a sprinkle of Italian seasoning.  Return the tray to the oven and bake for an additional 20 minutes.

Tip
Of course you could make these polenta rounds into any type of pizza your little heart desires! I chose these toppings because they were holiday-esk, but experiment! (and let us know what you do)

XOXO - Katie


Monday, November 25, 2013

Fall Mixed Green Salad w. Chipotle Vinaigrette

Welcome to THANKSGIVING WEEK on Eat Me!

Yes, that's right.  This is the week of Thanksgiving and we will be posting some recipes and tips to help you stay on track!  We all have our Thanksgiving favs (mine is green bean casserole) and I know from experience you have to be able to be comfortable indulging in these holiday foods in order to stay in control.  The last thing you want is to skip that green bean casserole on Thanksgiving, and then lay in bed on Thursday night with the green bean casserole in your head saying 'EAT ME, EAT ME'! When you don't indulge you many times end up going out of control.  So, anyways, what better recipe to start Thanksgiving week than a delish and flavorful fall salad.  This salad is anything but boring, easy to put together and low in points - YAHOO!  

Servings: 8
Serving Size: about 1 1/2 cups
Points Plus: 3 points plus
Level of Difficulty:
Prep Time: 10 minutes
Cook Time: n/a
Rating: 4 stars - Very Good

Ingredients
Dressing
3 T. olive oil
3 T. balsamic Vinegar
1-2 T. Chipotle
1 T. apple cider
1 t. dry parsley


Salad
1 package mixed greens
1 cup carrots
1/8 cup toasted almonds
1 oz goat cheese
1 apple, cut into small pieces
1/2 cup red onion, thinly sliced

This recipe is super EASY! Mix all dressing ingredients in a small bowl of THIS! If you have never tried chipotle peppers you should.  You can find them in your local market in the ethnic foods aisle. For this recipe, you only need to add the sauce.

Heat a tiny sauce pan on the stove and add the almonds.  Sautee them until they are toasted and light brown! Add all of the lettuce to a bowl and toss with the dressing.  Then, add the carrots, almonds, apple, onion and cheese.

Tip:
Do you know what a mandoline is?  Here is a pic!  You can use it to chop your onions into thinly sliced, beautiful circles! Not to mention you can use it for fruit, potatoes and anything else that you need to slice small.


Monday, November 18, 2013

Mini Pumpkin Cheesecakes

We are excited to bring you PUMPKIN WEEK!!!

Fall, autumn weather always gets me in the mood for something pumpkin.  You are in luck this week as Katie and I bring you lots of delicious pumpkin recipes to try out and add to your fall recipe list.   

I love finding new ways to bake with pumpkin.  This is a modification from my original cherry cheesecake recipe, but with pumpkin instead of cherry pie filling.  Enjoy!!
Servings: 20
Size: 1 mini cheesecake
Points Plus: 3pp
Level of Difficulty: Easy
Prep Time: 15 minutes
Cook Time: 25 minutes
Rating: 3 stars – Good 


Ingredient List:
Gingersnap cookies
2 8 oz pacakges of reduced fat cream cheese
¾ cup white sugar
1 cup pumpkin, canned
2 eggs
1 tsp. cinnamon
1 tsp. pumpkin pie spice
Pecan halves

Directions:
Preheat the oven to 350°.  Line a regular muffin tin with paper or tin liners. Place one gingersnap at the bottom of each liner; this will act as the ‘crust’ for your cheesecakes. Cream together the cream cheese, sugar first until fluffy.  Add in the pumpkin, mix well.  Next add the eggs, one at a time, and the cinnamon and pumpkin pie spice.  Fill each muffin liner with the cheesecake mixture, about ¾ full.  Bake for 20-24 minutes, or until a toothpick comes out clean.  Cool on a wire rack.  Top each mini cheesecake with a pecan half.  Refrigerate before serving.
Tip:
One piece of candy corn would also be a cute topping for each cheesecake.  Unfortunately, I made my batch of these the week after Halloween so all the shelves had been cleared of candy corn.  Pecan halves worked great as a substitution though!
XOXO Megan

Friday, November 15, 2013

Pumpkin Spice Cupcakes

This recipe is actually for Pumpkin Spice CAKE, but since I have little self control when it comes to desserts I used the old standby portion trick and turned them into cupcakes! This recipe is so simple and very low in points for a delish pumpkin dessert.  Enjoy!

Servings: 15
Servings Size: 1 cupcake
Points Plus: 3pp
Level of Difficulty: Easy
Prep Time: 5 minutes
Cook Time: 30 minutes
Rating: 4 - Very Good

Ingredients
1 box of spice cake
1/2 cup water
15 oz canned pumpkin
Fat-free cool whip*
Cupcake liners

Instructions
Preheat oven to 350.  Mix spice cake, water and pumpkin in a bowl.  Scoop cake mixture into cupcake tins and bake for about 30 minutes.  Let cool and top with cool whip.

Tip
Let's face it, fat-free cool whip is not the most 'natural' food out there.  Let's face it, it is 0pp so I don't really care! (I believe that anything is fine in moderation) I also like cool whip on pudding for another low point snack. Also - these freeze good and would make a tasty breakfast with a banana on the side!  And finally!!!! I used my Pampered Chef cookie scoop to put the batter in the muffin tins, it helped them be equal sizes!

XOXO - Katie

Wednesday, August 21, 2013

Beer Pretzel Dip

This is an easy appetizer dip you can throw together and serve with pretzels.  It's not too bad for you since you use light beer and reduced fat cheeses, but like anything... make sure you eat this in moderation!!

Servings:  Recipe will make 2 1/2 cups or about 13 servings
Serving Size: 3 Tbsp.
Points Plus: 3pp
Level of Difficulty: Easy
Prep Time: 5 minutes
Cook Time: n/a
Rating: 3 stars - Good

Ingredients:
2 - 8 oz. packages cream cheese, 1/3 less fat
1 package dry Hidden Valley Ranch dressing mix
1/4 to 1/2 cup light beer
1 cup. shredded sharp cheddar, reduced-fat

Directions:
In a medium bowl, mix the cream cheese, Ranch dressing mix and light beer with a mixer.  Fold in the shredded cheddar cheese, stirring until well mixed.  Serve with pretzels and enjoy!!

XOXO Megan

Tuesday, August 6, 2013

Spicy Corn Soup

This recipe was an attempt to experiment with some CSA corn on the cob.  Unfortunately the corn didn't turn out after I boiled it, so I used canned instead.  This soup turned out spicy with a ton of flavor!

Servings: 6
Size: 1 1/2 cup
Points Plus: 3 pp
Level of Difficulty: Easy
Prep Time: 15 minutes
Cook Time: 30 minutes
Rating: 3 stars - Good

Ingredient List: 
1 T. olive oil
1/2 cup white onion, chopped small
1 red pepper, chopped
1 green pepper, chopped
1 clove garlic
1 Kohlrabi, shredded
2 cups of corn
6 cups of chicken stock
1 bay leaf
1 can spicy Ro*tel tomatoes
1 1/2 t. ground cumin
1 t. ground turmeric
Salt and pepper to taste

Directions:
Heat olive oil in dutch oven.  Sautee onion, peppers and garlic for about 5 minutes.  Add remaining ingredients and bring to a boil.  Let simmer for about 30 minutes.  Don't forget to remove the bay leaf before serving!

Tip:
I used Kohlrabi in place of a potato and it turned out really nice.  I also shredded it to add a different texture than the other chopped veggies!

XOXO - Katie

Monday, July 29, 2013

Caprese Salad

Everyone loves a caprese salad, especially during the summer months when fresh tomatoes are EVERYWHERE!  A caprese salad can be an appetizer, side dish or even sometimes a full meal.  I served this as the first course to a multiple course Italian feast, and it was the perfect size to get things rolling.

Servings: 4
Size: 1 caprese stack
Points Plus: 3pp
Level of Difficulty: Easy
Prep Time: 5 minutes
Cook Time: n/a
Rating: 4 stars - Very Good

Ingredient List:
1 Heirloom tomato
4 t. olive oil
5 basil leaves
4 oz. fresh mozzarella
Kosher salt and pepper

Directions: 
Slice your tomato into four thick pieces horizontally, saving the top and bottom piece for personal consumption (0pp)! Slice your mozzarella ball into 4 1 oz slices horizontally.  Clean your basil leaves.  Layer on each serving plate 1 tomato slice, 1 basil leaf and 1 mozzarella slice. Drizzle each serving with 1 t. olive oil and then salt and pepper to taste.

Tip:
This is hands down the BEST cheese knife ever.  It works best for soft cheese, and makes cutting nice and clean.  The knife is a little pricey but for sure worth the investment!

XOXO - Katie

Wednesday, July 17, 2013

Fresh Green Beans with Tomatoes and Goat Cheese

Fact: I hate balsamic vinegar and roasted tomatoes.  Fact: This recipe made me love both!  And I don't mean like, I mean L.O.V.E.  Who knew!?  Who knew that when you roasted baby tomatoes in olive oil and balsamic vinegar that it created a delicous thick sauce?  Who knew that the combo of roasted tomatoes and green beans is the bomb?  Who knew that goat cheese is great on anything? (I knew that!) Goat cheese is actually a really low fat cheese that I am going to start using more this summer.  Anyways, enjoy this as a side or main dish with your fresh veggies.  Also as a side, it is almost tomato time! (I am so excited)

Servings: 4
Size: About 1 1/2 cups
Points Plus: 3pp
Level of Difficulty: Easy
Prep Time: 5 minutes
Cook Time: 15 minutes
Rating: 4 stars - Very Good

Ingredient List:
4 cups fresh green beans, trimmed and cleaned
1 cup cherry tomatoes, halved
1 T. olive oil
2 T. good balsamic vinegar
2 oz. goat cheese

Directions: 
Bring a pan with water to a boil and cook beans about four minutes.  Remove from heat and strain. Heat olive oil in pan and sautee tomatoes until soft, about 4 minutes.  Add balsamic and sautee 1 minute more.  Add beans and sautee about 3 more minutes.  Portion you dish and add equal parts of goat cheese to both plates.  Enjoy!

Tip:
You could add the goat cheese to the sautee pan while still on the heat to made a more creamy sauce.  Also, I am sure this dish would be great with garlic and onions but I just wasn't in the mood (which is weird because as you know I love onions)

XOXO - Katie

Friday, June 21, 2013

Roasted Cauliflower, Chickpeas, and Olives

Here is a tasty little side dish (or even a veggie meal).  As you know, I love salt, and the combo here of green olives and chick peas works so well! I lightened the below recipe up just a bit from this recipe (also visit that site to see a more tasty looking photo) by totally eliminating the oil. I think you can for sure cut back the oil on most roasting recipes.

Servings: 6
Size: 2/3 cup
Points Plus: 3pp
Level of Difficulty: Easy
Prep Time: 10 minutes
Cook Time: 22 minutes
Rating: 4 - Very Good

Ingredient List: 
1 lb. cauliflower, cut into florets
24 green olives, sliced
8 garlic cloves, coarsely chopped
15 oz. (one can) chickpeas, rinsed and drained
1/2 t. crushed red pepper
1/4 t. kosher salt
3 T. fresh flat leaf parsley leaves

Directions:
Preheat oven to 450

Combine first four ingredients in a small roasting pan.  Sprinkle with salt and pepper and toss well.  Bake at 450 for 25 minutes, or until cauliflower is browned to your liking.  Stir after 10 minute. Garnish with parley and enjoy!

Tip: 
For some strange reason I HATE (which is a strong word) butting cauliflower (and broccoli for that matter) which is weird because I LOVE chopping veggies, even onions (those are my fav!).  Here is a little video that might help your cauliflower chipping skilz.

XOXO - Katie

Tuesday, May 28, 2013

Donut Kabobs

Looking for something FUN to serve at your next brunch?  Donut kabobs are a perfect little treat.  I served these for Easter brunch this year and they were a hit with my family.  These are great to serve at either a wedding or baby shower too.  Easy entertaining!
Servings:  As many as you need
Size:  One kabob
Points Plus: 3 pp
Level of Difficulty:  Easy
Prep Time: 10 minutes
Cook Time: n/a
Rating: 4 stars – Very good

Ingredient List:
Donut holes
Strawberries
Blackberries
Skewers

Directions:
Wash the strawberries and blackberries.  Slice the strawberries in half.  Assemble each skewer, alternating each fruit type along with the donut holes.  Feel free to use whatever type of donut hole you prefer – glazed, cinnamon sugar or powdered (I prefer glazed, and they are the least messy J).
Tip:
Just like the fruit kabobs I posted about a month ago, these kabobs can easily fit the color scheme of your party, shower or brunch.  Switch out what fruit you use to match the colors or theme of your gathering!
XOXO Megan


Thursday, May 16, 2013

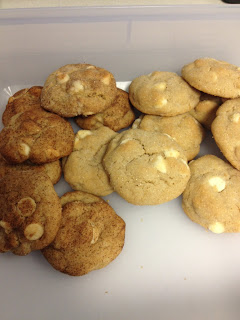
White Chocolate Snickerdoodle Pudding Cookies

It’s important to remember that it’s totally okay to indulge a little every once in a while!  I wouldn’t recommend you make these weekly by any means... especially because they are so good it will be hard to stop eating these cookies. :)  I made these to bring into work to share with my coworkers. They loved them!  This is one of my many recipes I have pinned on my ‘desserts’ board on Pinterest.  I was intrigued that these cookies had instant pudding mix as one of the ingredients.  Apparently pudding cookies have become really popular in the past year or so, who knew??
Yield:  4 dozen
Points Plus: 3 pp for one cookie 
Level of Difficulty:  Easy
Prep Time: 15 minutes
Cook Time:  10-12 minutues per batch
Rating: 4 stars – Very good

 Ingredient List:
1 cup unsalted butter
¾ cup brown sugar
¼ cup white sugar
1 3.4 oz package white chocolate instant pudding mix
2 large eggs
1 tsp. vanilla extract
2 ¼ cups all-purpose flour
1 tsp. baking soda
½ tsp. salt
2 cups white chocolate chips
1 tsp. cinnamon
1/3 cup cinnamon sugar (used to roll cookies in before baking)


Directions:
Preheat the oven to 350°.  Lightly spray cookie sheets with cooking spray.  Cream together the butter and brown and white sugars.  Add in the eggs, one at a time; make sure they are mixed well.  Next, add in the instant pudding mix, vanilla, flour, baking soda, salt and cinnamon.  Use a spatula to make sure you mix in all the dry ingredients thoroughly.  Fold in the 2 cups of white chocolate chips with the spatula.  Scoop out the cookies (about 3 Tbsp. per cookie), roll into a ball and then roll in the cinnamon sugar to evenly coat each cookie.  Place on the cookie sheets about 2 inches apart from each other.  Bake for 10-12 minutes, until slightly golden and just set in the middle. 
Note: I chose to make my first dozen cookies rolled in cinnamon sugar, but I did all others rolled in just white sugar.  I thought the cinnamon sugar was a little too overpowering for my taste.

Tip:
To keep your number of cookies you eat in check, plan to bring ALL of them into work to share and keep them at work in tupperware! That way you won't be tempted by having dozens of cookies at home AND your coworkers will appreciate your generosity. :)

XOXO Megan

Tuesday, May 7, 2013

Mashed Cauliflower

Did you know that you can mash (puree) cauliflower and add some spices so that it tastes almost like mashed potatoes?  Well...YOU CAN! This is an easy, guilt-free side dish that is quick and fun. 

Servings: 3
Size: 1 cup
Points Plus: 3 pp
Level of Difficulty: Easy (if you have a blender or immersion blender)
Prep Time: 10 minutes
Cook Time: 10 minutes
Rating: 3 stars - Good

Ingredients List:
1 head of raw cauliflower
1 bouillon cube
3 oz. low fat cream cheese
Splash of milk (maybe 1 Tbsp.)
Salt & pepper
Paprika
Chives

Directions: 
Boil water in large stock pot, add a pinch of salt and a bouillon cube (veggie, beer or chicken). Chop cauliflower into small pieces and rinse in a colander. When water is at a rolling boil add cauliflower and boil for 10 minutes, or until soft.  Drain cauliflower in colander and return to pot. Make sure cauliflower is well drained. Move pot to counter, and add cream cheese, salt & pepper to taste, a dash of paprika and milk.  Using your immersion blender, regular blender or potato masher, blend cauliflower to desired consistency.  Place even portions of mashed cauliflower in dishes and garnish with chopped fresh chives. Close your eyes and you will not know the difference!

Tip:
In immersion blending is very handy in the kitchen for dishes like this, soups or other foods that require a food processor (most have a food processor attachment).  Pick one up today for future stress-free pureeing.

Thursday, April 18, 2013

Mini Cherry Cheesecakes

If you are looking for a quick dessert, that isn’t overly indulgent here is a great recipe for you to make.  Every time I’ve made this dessert, people seem to be really impressed by it.  It’s also great since it takes minimal effort to make.
Servings:  16
Size:  1 mini cheesecake
Points Plus: 3 pp
Level of Difficulty:  Easy
Prep Time: 15 minutes
Cook Time:  15 minutes
Rating: 4 stars – Very good

Ingredient List:
Nilla wafers, reduced fat
2 8 oz. packages of reduced fat cream cheese
¾ cup white sugar
2 eggs
1 tsp. vanilla extract
¾ cup cherry pie filling

Directions:
Preheat the oven to 350°.  Line a regular muffin tin with paper or tin liners. Crush the vanilla wafers in a large zip lock bag and place a small amount of the crushed wafers at the bottom of each liner (if you want to save some time you can just place one whole wafer at the bottom of each liner instead of the crushed mixture). With a mixer, cream together the cream cheese, sugar, eggs and vanilla.  Fill each muffin liner with the cheesecake mixture, about ¾ full.  Bake for 15 minutes.  Cool on a wire rack.  Top each mini cheesecake with cherry pie filling and chill before serving.
Tip:
This is a great recipe to bring to a dinner party.  It’s really versatile… substitute the cherry pie filling for blueberry or whatever other fruit you prefer to mix it up a bit.  Another option to try, make these in mini muffin pans for an even smaller bite-sized version!

Thursday, April 11, 2013

Egg Drop Soup

It is snowing in Minnesota.  Actually let me rephrase that, it is BLIZZARDING in Minnesota! (in mid-April) Anyways, to follow up on Megan’s Asian inspired post from yesterday, I wanted to share one of my favorite comfort food meals, egg drop soup.  This recipe is so easy, and in my opinion tastes just like the restaurant kind! (with less MSG)  

Servings:  2
Size:  Just over 4 cup
Points Plus: 3 pts
Level of Difficulty:  Easy
Prep Time: 5 minutes
Cook Time:  10 minutes
Rating: 4 stars – Very good

Recipe above modified from this one.
Ingredient List:
4 cups chicken broth (canned, boxed of bouillon cubes work)
1/8 teaspoon ground ginger
2 tablespoons chopped green onions
2 tablespoons cornstarch
2 eggs
A drizzle of soy sauce if desired

Directions:
Reserve 3/4 cup of chicken broth, and pour the rest into a large saucepan. Stir the ginger and chives into the saucepan, and bring to a rolling boil. In a cup or small bowl, wisk together the remaining broth and cornstarch until smooth. Set aside.

In a small bowl, whisk the eggs together. Drizzle egg a little at a time from the fork into the boiling broth mixture. Egg should cook immediately. Once the eggs have been dropped, stir in the cornstarch mixture gradually until the soup is the desired consistency.

Tip:
Adding the cornstarch mixture at the end keeps the soup from boiling over.  After the mixture is added watch the soup very closely.  The longer it cooks the thicker it will get but I have had many overflow accidents with this one!

XOXO - Katie

LinkWithin

Related Posts Plugin for WordPress, Blogger...