Pages

Showing posts with label indulge. Show all posts

Thursday, January 9, 2014

Champagne Orange Bundt Cake

I came across this recipe on Pinterest as I was searching for a fun, festive dessert to serve on New Year's Eve.  The original recipe (found here) comes from the Muffin Tin mom's blog.  I wasn't able to find the orange mimosa flavored sparkling wine that her recipe calls for so I improvised and used a combination of champagne and orange juice instead - two ingredients you already need for the frosting!  I also chose to omit the sliced almonds to cut down on pp.  Enjoy this bubbly cake!
Servings: 10
Size: One slice of 1/10 of the cake
Points Plus: 8pp
Level of Difficulty: Easy
Prep Time: 10 minutes
Bake Time: 25-30 minutes
Rating: 4 stars - Very good


Ingredient List:
Cake Batter
1 box white cake mix
2/3 cup champagne
1/3 cup orange juice
3 eggs
Baking spray

Frosting
¼ cup champagne
¼ cup orange juice
1 ½ cups powdered sugar

Directions:
Preheat the oven to 350°. In a medium bowl, mix together the cake mix, champagne, orange juice and eggs until well combined.  Pour batter into a lightly greased bundt pan.  Bake according to the directions on the box, about 25-30 minutes.  Allow the cake to cool completely before you frost it.  To make the frosting, first combine the champagne and orange juice in a large bowl.  Add the powdered sugar a ½ cup at a time until the frosting reaches the consistency you are looking for.  It will be more of a glaze than a thick frosting.
Tip:
I don't know about you, but I REALLY struggle when it comes to making frostings!  I think the key is to not have too much liquid so you don't have to add as much powdered sugar to even out the consistency.  That said, you could use slightly less champagne and orange juice in the frosting to make for a thicker frosting if you prefer. 
XOXO Megan

Friday, December 6, 2013

Raspberry Almond Bars


These bars are super easy to make and taste delcious!  The raspberry preserves helps you save time instead of making a raspberry sauce from scratch.  You could easily substitute in another fruit preserve instead if you prefer something else - strawberry, blueberry, blackberry etc!

Servings: 16
Size:  1 bar
Points Plus: 4pp
Level of Difficulty:  Easy
Prep Time: 10 minutes
Bake Time:  25-30 minutes
Rating: 5 stars – Excellent

Ingredient List:
1 cup flour
¾ cup oats
½ cup sugar
½ cup butter
½ tsp. almond extract
½ cup red raspberry preserves
1/3 cup almonds, sliced

Directions:
Preheat the oven to 350°. Lightly grease an 8x8 or 9x9 baking pan.  In a large bowl, mix together the flour, oats and sugar.  Add in the butter and cut with a pastry blender until the mixture resembles coarse crumbs.  Stir in the almond extract and mix well.  Reserve about 1 cup of the oat mixture.  Press the remaining mixture into the bottom of the pan, pressing down firmly to bind the crumbs together.  Spread the raspberry preserves over the top to about ½ inch from the edges of the pan.  Mix the sliced almonds with the reserved oat mixture and sprinkle on top of the preserves; press down gently.  Bake for 25 to 30 minutes or until the edges are golden brown.
Tip:
Not everyone owns a pastry blender!  That’s okay, this recipe can still be made without one.  Use a fork instead to cut the butter into the oat/flour/sugar mixture.  You have to keep working at it, but eventually the mixture will turn into crumbs!
XOXO Megan

Wednesday, November 20, 2013

Pumpkin Chocolate Chip Bundt Cakes

These are DELICIOUS, indulgent little cakes!  I served these at a family brunch recently and they were very popular.  Adding in chocolate chips is a perfect pairing with pumpkin!  And mini chocolate chips are just so cute. :)

This recipe comes from Skinnytaste.  The original recipe has these made into mini-muffins which would make 28 mini muffins or 14 regular sized muffins if you wanted to try a different variation for less points (see all pp values listed below).

Servings:  6
Size:  1 mini bundt cake
Points Plus: 8pp
Level of Difficulty:  Easy
Prep Time: 15 minutes
Cook Time:  25-28 minutes
Rating: 4 stars – Very Good
*PP value for 1 regular muffin would be 4pp, 1 mini muffin would be 2pp
Ingredient List:
½ cup whole wheat flour
¾ cup all purpose flour
¾ cup sugar
¾ tsp. baking soda
1 ¾ tsp. pumpkin pie spice
¼ tsp. cinnamon
¼ tsp. salt
1 ½ cup canned pumpkin (equal to 1 15 oz. can)
1 Tbsp. vegetable oil
2 egg whites
2 tsp. vanilla
2/3 cup mini chocolate chips
Cooking spray

Directions:
Preheat the oven to 350°. Spray the mini bundt pan with cooking spray.  In a large bowl, combine the two types of flour, sugar, baking soda, pumpkin pie spice, cinnamon and salt; mix well.  In a large bowl, combine the pumpkin, oil, egg and vanilla – beat until well combined, making sure to scrape the sides of the bowl.  Add the flour mixture to the pumpkin mixture in multiple steps.  Do not over mix.  Fold in the mini chocolate chips with a spatula.  Using a spoon, drop spoonfuls of batter into each mini bundt mold.  Bake for 25-28 minutes, or until a toothpick comes out clean.  Let your mini bundt cakes cool before serving.
Tip:
An easy way to get your mini bundt cakes out of the pan is to flip your cooling rack upside down and place on top of the bundt pan.  Flip both the pan and rack upside down so the cooling rack is right side up (set on your counter) and the bundt pan is upside down. Your mini bundt cakes should pop right out of the pan and be perfectly placed to cool!
XOXO Megan

Monday, November 18, 2013

Mini Pumpkin Cheesecakes

We are excited to bring you PUMPKIN WEEK!!!

Fall, autumn weather always gets me in the mood for something pumpkin.  You are in luck this week as Katie and I bring you lots of delicious pumpkin recipes to try out and add to your fall recipe list.   

I love finding new ways to bake with pumpkin.  This is a modification from my original cherry cheesecake recipe, but with pumpkin instead of cherry pie filling.  Enjoy!!
Servings: 20
Size: 1 mini cheesecake
Points Plus: 3pp
Level of Difficulty: Easy
Prep Time: 15 minutes
Cook Time: 25 minutes
Rating: 3 stars – Good 


Ingredient List:
Gingersnap cookies
2 8 oz pacakges of reduced fat cream cheese
¾ cup white sugar
1 cup pumpkin, canned
2 eggs
1 tsp. cinnamon
1 tsp. pumpkin pie spice
Pecan halves

Directions:
Preheat the oven to 350°.  Line a regular muffin tin with paper or tin liners. Place one gingersnap at the bottom of each liner; this will act as the ‘crust’ for your cheesecakes. Cream together the cream cheese, sugar first until fluffy.  Add in the pumpkin, mix well.  Next add the eggs, one at a time, and the cinnamon and pumpkin pie spice.  Fill each muffin liner with the cheesecake mixture, about ¾ full.  Bake for 20-24 minutes, or until a toothpick comes out clean.  Cool on a wire rack.  Top each mini cheesecake with a pecan half.  Refrigerate before serving.
Tip:
One piece of candy corn would also be a cute topping for each cheesecake.  Unfortunately, I made my batch of these the week after Halloween so all the shelves had been cleared of candy corn.  Pecan halves worked great as a substitution though!
XOXO Megan

Wednesday, August 21, 2013

Beer Pretzel Dip

This is an easy appetizer dip you can throw together and serve with pretzels.  It's not too bad for you since you use light beer and reduced fat cheeses, but like anything... make sure you eat this in moderation!!

Servings:  Recipe will make 2 1/2 cups or about 13 servings
Serving Size: 3 Tbsp.
Points Plus: 3pp
Level of Difficulty: Easy
Prep Time: 5 minutes
Cook Time: n/a
Rating: 3 stars - Good

Ingredients:
2 - 8 oz. packages cream cheese, 1/3 less fat
1 package dry Hidden Valley Ranch dressing mix
1/4 to 1/2 cup light beer
1 cup. shredded sharp cheddar, reduced-fat

Directions:
In a medium bowl, mix the cream cheese, Ranch dressing mix and light beer with a mixer.  Fold in the shredded cheddar cheese, stirring until well mixed.  Serve with pretzels and enjoy!!

XOXO Megan

Tuesday, July 30, 2013

Mint, Cucumber and Bubbly Vodkas

This is a light, summery drink that is oh so good!  My friend Jessica made this as our signature cocktail for my bachelorette party last weekend.  I love any cocktail that involves a simple syrup and I especially love ones with champagne.  I LOVE champagne!! 

*This recipe came from the MN Monthly magazine.

Servings: 1
Size: 6 oz.
Points Plus: 5pp
Level of Difficulty: Medium (just because of the simple syrup) 
Prep Time: Syrup - 25 minutes; Cocktail - 2 minutes
Cook Time: n/a
Rating: 4 stars - Very Good

Ingredients:
Ingredients for 1 drink:
1 1/2 oz. Prairie Vodka
3 oz. honey-mint-cucumber simple syrup
2 oz. champagne

Simple Syrup:
1 cup honey
2 cup water
Handful of mint leaves
1 6-inch cucmber, grated
Pinch of sea salt

Directions:
Prepare the simply syrup by simmering the honey with water and mint leaves until reduced by half or about 20 minutes.  In a small bowl, grate the cucumber and add the pinch of sea salt; let stand.  When the syrup is reduced, pour over the grated cucumber.  Cool to room temperature, then strain into a jar and chill.
Note: The simple syrup will last you through multiple cocktails. The pp value above is for just one drink. 

To prepare one cocktail, add the drink ingredients into a chilled glass.  We chose to use stemless wine glasses.

Tip:
The lemon zester I mentioned in this post would work GREAT for grating the cucumber for the simple syrup - test it out when you make this summer drink!

XOXO Megan

Thursday, July 18, 2013

Island Rum Cake

Today is my birthday!!!  As I celebrate and indulge a bit (it is my birthday after all), here is a fun summer dessert for you to check out and maybe try out at the next time you have company?  This is a Pampered Chef recipe found here.  I made a few slight modifications, but it is basically the same recipe.  Enjoy!
Servings:  16
Size:  1/16 of cake
Points Plus: 10pp
Level of Difficulty:  Medium
Prep Time: 40 minutes
Cook Time:  15-18 minutes
Rating: 4 stars – Very good

Ingredient List:
Cake:
1 box of yellow cake mix
1/3 cup vegetable oil
1/3 cup water
1 egg
1 can crushed pineapple, in juice, undrained
½ cup sweetened flaked coconut

Filling & Fruit Topping:
1 package vanilla instant mudding mix, sugar-free
1 cup milk
2 cups thawed, frozen whipped topping
2 Tbsp. dark rum
1 kiwi, peeled and sliced
1 large mango, peeled and sliced
¼ cup toasted coconut

Syrup:
¼ cup brown sugar
2 Tbsp. dark rum
2 Tbsp. water
1 tsp. cinnamon

Directions:
Preheat the oven to 350°.  Use two torte pans (I used Pampered Chef’s version which are 10 ½ inches round) to make the cake in.  Spray each pan with cooking spray and place an 8 inch circle of parchment paper over the center of each pan.  In a large bowl, combine the cake mix, oil, water, egg and pineapple until well mixed.  Fold in the coconut flakes.  Divide the cake batter evenly between the two pans.  Bake for 15-18 minutes or until a toothpick comes out clean.  Let the cakes cool before you try and remove them from the pans; let cool on a wire cooling rack.  In a small saucepan, bring the brown sugar, dark rum, water and cinnamon to a boil over medium-high heat to make the syrup.  Whisk the mixture until the sugar is fully dissolved.  Cook for 1-2 minutes until the syrup is reduced to about ¼ cup; remove from heat.  Whisk the pudding mix and milk together to make the filling and add in 1 cup of whipped topping and the 2 Tbsp. rum.  Prep the kiwi and mango and cut into slices for the top of the cake.
Assemble the cake by starting with one torte cake on a round platter.  Brush the syrup topping over the top of the cake.  Using a cake decorating tool, pipe the filling mixture around the edge of the cake and spread evenly across the top of the cake.  Layer on the next cake layer and arrange the slices of mango and kiwi in the middle of the cake. Brush the remaining syrup on top of the fruit slices. Pipe around the edge of the top cake layer with the remaining filling and sprinkle the toasted coconut on top of the filling.
Tip:
A good cake decorating tool can help you to make impressive looking desserts!  I am partial to this version from Pampered Chef.
XOXO Megan

Thursday, July 4, 2013

Red, White & Blue-Berry Trifle

Happy 4th of July!!!  The 4th is one of my favorite holidays.  I absolutely love fireworks!  I also love summer BBQs and this is the perfect dessert to bring with you to a summer party.  This is a modified version of a berry, cake and pudding trifle.  I’ve adjusted the recipe to pack in extra berries and found substitues for the high pp value items like pound cake, cream, excess sugar, etc.

Servings:  8
Size:  1/8 of the trifle
Points Plus: 4pp
Level of Difficulty:  Easy
Prep Time: 25 minutes
Cook Time: n/a

Ingredient List:
Angel food cake (store-bought already baked version)
3 cups fresh strawberries, sliced
2 cups fresh blueberries
1 container Greek fat free yogurt, raspberry flavored
2 packages vanilla instant pudding mix, sugar-free
2 cup skim milk

Directions:
Wash and prepare the berries. In a large bowl, mix together with a whisk the milk, Greek yogurt and instant pudding mixes until the mixture has a thick consistency. In the bottom of your trifle bowl, start layering beginning with angel food cake.  Use 1/3 of the cake and tear off 1-2 inch pieces of cake and fill until the bottom of the bowl is covered.  Next use 1/3 of the pudding mixture, drop spoonfuls on top of the cake layer.  Finally, make the berry layer using 2/3 cup of blueberries and 1 cup of strawberries.  Repeat the 3 layers twice more resulting in 3 layers of each and ending with berries at the top of the trifle.  Refrigerate until you are ready to serve.

Tip:
The pudding mixture might be a little dull in color depending on what Greek yogurt you use.  I added about 10 drop of red food coloring to my mixture to bring out a richer pink color to make the pudding layer look more festive!

XOXO Megan

Thursday, May 30, 2013

Graudation Cupckaes

My brother graduated last weekend from St. Olaf and to help with the celebration my mom made these adorable graduation cupcakes.  She and I made a few prototypes to the get the cap and tassel just right, but by the end we had perfected it.  They were delicious too!
Servings:  24
Size:  1 cupcake
Points Plus: 8pp
Level of Difficulty:  Medium
Prep Time: 1 hour
Cook Time:  20 minutes
Rating: 4 stars – Very good

Ingredient List:
1 box of fudge cake mix
1 cup mini semi-sweet chocolate chips (set aside 1 Tbsp. for later)
Vanilla frosting
24 mini Reese’s peanut butter cups
24 Ghirardelli dark chocolate squares
24 M&Ms
One decorative tassel


Directions:
Prepare the fudge cake mix according to the directions on the box.  Add in the cup of mini chocolate chips into the cupcake batter.  Line a regular muffin tin with paper or tin liners. Fill each cupcake liner about 2/3 full.  You want your cupcakes to be on the small side since you will be adding frosting and the graduation cap.  Ideally the cupcakes will just come to the top of the cupcake liner once baked. Bake the cupcakes according to the box, probably about 18-20 minutes, depending on your oven.  Since you are making smaller cupcakes you should be able to get 24 cupcakes in total.  While the cupcakes are baking, in a small bowl, melt 1 Tbsp. of mini chocolate chips.  You will use this chocolate as a glue to attach and assemble the graduation cap. 
Once the cupcakes have cooled, frost each with a generous amount of frosting per cupcake.  To assemble the graduation cap, first put a small dab of chocolate glue on the top of an upside down mini Reese’s peanut butter cup (the larger surface area should be on the bottom), affix the Ghirardelli square on top.  The chocolate square should also be upside down with the flat, smooth side facing up.  Next, dab a very small amount of chocolate glue to the middle of the Ghirardelli square – attach a few strands of tassel (we found a decorate tassel and cut it apart to make smaller tassels), then add more chocolate to affix a single M&M on top. Serve at your party and hopefully people are impressed with your creativity! 
Warning:  Don’t EAT the tassel! J
Tip:
Creative cupcakes can be a really big hit for any sort of party – graduation, housewarming, holiday/seasonal, etc. We made these graduation cupcakes in St. Olaf colors – gold and black (well chocolate), but you could easily adapt to different school colors.
XOXO Megan
 

Thursday, May 16, 2013

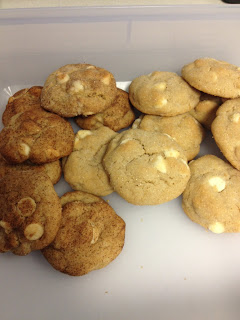
White Chocolate Snickerdoodle Pudding Cookies

It’s important to remember that it’s totally okay to indulge a little every once in a while!  I wouldn’t recommend you make these weekly by any means... especially because they are so good it will be hard to stop eating these cookies. :)  I made these to bring into work to share with my coworkers. They loved them!  This is one of my many recipes I have pinned on my ‘desserts’ board on Pinterest.  I was intrigued that these cookies had instant pudding mix as one of the ingredients.  Apparently pudding cookies have become really popular in the past year or so, who knew??
Yield:  4 dozen
Points Plus: 3 pp for one cookie 
Level of Difficulty:  Easy
Prep Time: 15 minutes
Cook Time:  10-12 minutues per batch
Rating: 4 stars – Very good

 Ingredient List:
1 cup unsalted butter
¾ cup brown sugar
¼ cup white sugar
1 3.4 oz package white chocolate instant pudding mix
2 large eggs
1 tsp. vanilla extract
2 ¼ cups all-purpose flour
1 tsp. baking soda
½ tsp. salt
2 cups white chocolate chips
1 tsp. cinnamon
1/3 cup cinnamon sugar (used to roll cookies in before baking)


Directions:
Preheat the oven to 350°.  Lightly spray cookie sheets with cooking spray.  Cream together the butter and brown and white sugars.  Add in the eggs, one at a time; make sure they are mixed well.  Next, add in the instant pudding mix, vanilla, flour, baking soda, salt and cinnamon.  Use a spatula to make sure you mix in all the dry ingredients thoroughly.  Fold in the 2 cups of white chocolate chips with the spatula.  Scoop out the cookies (about 3 Tbsp. per cookie), roll into a ball and then roll in the cinnamon sugar to evenly coat each cookie.  Place on the cookie sheets about 2 inches apart from each other.  Bake for 10-12 minutes, until slightly golden and just set in the middle. 
Note: I chose to make my first dozen cookies rolled in cinnamon sugar, but I did all others rolled in just white sugar.  I thought the cinnamon sugar was a little too overpowering for my taste.

Tip:
To keep your number of cookies you eat in check, plan to bring ALL of them into work to share and keep them at work in tupperware! That way you won't be tempted by having dozens of cookies at home AND your coworkers will appreciate your generosity. :)

XOXO Megan

Friday, April 19, 2013

Chocolate Stout Cake

Here is a good little recipe if you ever want people to think you are the most amazing baker of ALL. TIME. This cake is amazing, relatively easy for being 100% home made, and the bomb (did I already say it was good??)  Chocolate + Beer is an dynamic combo, especially stout.  Warning, this cake is dense but worth every bite. And even better, it can be made days ahead of time, it only gets better by sitting overnight(s). I followed this cake recipe, but used my own cream cheese/whipping cream frosting recipe (which deserves it's own post). The chocolate frosting that is included with the recipe is also amazing. When calculating the points plus value, I honestly could not bring myself to tell the truth (ahm, over 30pp per slice if you follow the recipe).   So, to practice portion control which is essential for a healthy lifestyle, I calculated them as cupcakes using just under 1/2 cup of batter for each.

Servings: 1 cupcake with 1 smearing (about a Tbsp.) chocolate frosting included in the recipe link above
Size: 1/48 of recipe
Course: Dessert
Points Plus: 8pp (only 5 pp without frosting)
Level of Difficulty: Moderate
Prep Time: 30 mins total including frosting
Cook Time: 18-22 mins
Rating:  5 - AMAZING

Tip:
Use a big bowl! There is enough batter for a three layer cake or 48 cupcakes.  FYI - that is a ton of batter!  Also, when adding sprinkles to frosting put them on right before serving so they don't bleed.  Also, feel free to read through the reviews on the website.  People have gotten very creative with this recipe, including adding a caramel to the middle and using a dusting of powdered sugar instead of frosting. 
Exhibit ONE - simmering beer + butter

Exhibit TWO - Delish cake!

Thursday, April 18, 2013

Mini Cherry Cheesecakes

If you are looking for a quick dessert, that isn’t overly indulgent here is a great recipe for you to make.  Every time I’ve made this dessert, people seem to be really impressed by it.  It’s also great since it takes minimal effort to make.
Servings:  16
Size:  1 mini cheesecake
Points Plus: 3 pp
Level of Difficulty:  Easy
Prep Time: 15 minutes
Cook Time:  15 minutes
Rating: 4 stars – Very good

Ingredient List:
Nilla wafers, reduced fat
2 8 oz. packages of reduced fat cream cheese
¾ cup white sugar
2 eggs
1 tsp. vanilla extract
¾ cup cherry pie filling

Directions:
Preheat the oven to 350°.  Line a regular muffin tin with paper or tin liners. Crush the vanilla wafers in a large zip lock bag and place a small amount of the crushed wafers at the bottom of each liner (if you want to save some time you can just place one whole wafer at the bottom of each liner instead of the crushed mixture). With a mixer, cream together the cream cheese, sugar, eggs and vanilla.  Fill each muffin liner with the cheesecake mixture, about ¾ full.  Bake for 15 minutes.  Cool on a wire rack.  Top each mini cheesecake with cherry pie filling and chill before serving.
Tip:
This is a great recipe to bring to a dinner party.  It’s really versatile… substitute the cherry pie filling for blueberry or whatever other fruit you prefer to mix it up a bit.  Another option to try, make these in mini muffin pans for an even smaller bite-sized version!

LinkWithin

Related Posts Plugin for WordPress, Blogger...