Pages

Showing posts with label dessert. Show all posts

Friday, December 20, 2013

Homemade Peppermint Patties

Although my family has our traditional Christmas cookie favorites, we always like to test out a new recipe every year.  This year we chose this recipe, found on the Blue Eyed Bakers blog. We thought it looked like a bit of a challenge to try and make your own peppermint patties! They turned out pretty well, the only issue we had was making sure to remove as much excess chocolate as possible when dipping and transferring to the cookie sheet to set.  It did get easier with some practice and as mentioned below… key to success is FROZEN patties.  We did shrink the size a bit to offer bite-size pieces and for a lower pp value!

Servings: Recipe will make 44 small, bite-sized patties
Size:  1 peppermint patty
Points Plus: 2pp
Level of Difficulty: Medium
Prep Time: 45 minutes (including time while in the freezer)
Bake Time:  n/a
Rating: 4 stars – Very Good

Ingredient List:
2 ½ cups powdered sugar, divided
1 ½ Tbsp. light corn syrup
2 Tbsp. water
1 tsp. peppermint extract
1 Tbsp. vegetable shortening
8 oz. 70% cacao bittersweet chocolate, chopped
¼ cup peppermint candies, crushed

Directions:
In a medium bowl, beat together 2 ¼ cups of powdered sugar with corn syrup, water, peppermint extract and shortening until just combined. Use the remaining ¼ cup of powdered sugar to sprinkle the counter to prepare for kneading.  Work the dough into a ball and gently knead until the dough is smooth.  Shape the mixture into 2 logs, about 1 inch wide by 8 inches long.  Wrap each log tightly in parchment paper and freeze for 20 minutes; it should be very firm.  Remove the logs and cut each one into slices to form the peppermint patties.  You may need to reshape each one to resemble more of a round shape with your fingers.  Place the peppermint patties on a baking sheet lined with parchment paper and freeze again for another 15-20 minutes.  While you are waiting for the patties to freeze, melt the 70% cacao chocolate in a microwavable glass dish for 30 seconds at a time until fully melted.  Line another cookie sheet with parchment paper and remove a small amount of peppermint patties from the freezer for dipping.  Key to this part of the process is making sure the patties are VERY cold.  Dip each peppermint patty in the melted chocolate, making sure to evenly coat all sides.  Shake very gently so any excess chocolate falls off before you transfer to the cookie sheet.  Immediately top with a sprinkle of crushed peppermint candies.  Repeat until all peppermint patties are coated and sprinkled.  Allow the chocolate to harden and set (this will take about an hour) before you put into Tupperware.
Tip:
I cannot stress enough the importance of very firm, frozen peppermint patties when you get to the chocolate coating step!  If you start to have issues, just throw the cookie sheet back in the freezer for a few minutes and take a break.  You can only dip a handful of patties within each window before they start warming up too much!
XOXO Megan

Thursday, December 19, 2013

Red Velvet Oreo Truffle Brownie Bars

I don’t know how you could go wrong with Oreos + Truffles + Red Velvet Brownies + Chocolate + Chocolate Chips.  Which perhaps is why this holiday dessert is the bomb?  The red velvet layer gives these bars a fun holiday coloring, and the Oreo truffle layer is, well, super tasty.  These are a treat, with a high pp count, so enjoy and savor every bite! This recipe was originally found here, I made a few changes.

Servings: 40
Serving Size: 1 delicious brownie bar
Points per serving: 5pp
Prep Time: 20 minutes
Cook Time: 22-25 minutes
Level of Difficulty: Medium
Rating: 5 – Excellent!

Ingredients
1 Duncan Hines box Red Velvet cake mix
1/2 cup butter, melted
2 eggs
6 tablespoons vegetable oil
1 package Oreos
8 ounce package fat-free cream cheese
1/2 package (1/2lb) chocolate bark or about 1-1/2 cups chocolate chips)
3/4 cup mini chocolate chips for garnish

Instructions
Preheat oven to 325 degrees. Combine cake mix, melted butter, eggs, pudding mix, vegetable oil and mix well until thoroughly combined (2-3 minutes on medium of electric mixer).

Spray a 9x13 with nonstick cooking spray. I like the baking variety that has flour in it. Then spread the red velvet brownie layer into the pan.  Don’t be surprised, this mixture is thick like a brownie.  Use a spoon to spread out evenly.

Bake for 20-22 minutes or until a toothpick inserted comes out clean.  Watch very closely the last few minutes.  I actually baked mine for about 25 minutes, but a friend baked hers for 22 minutes and the edges burned.  Let cool completely.

Crush a package of Oreos in a food processor (or in a large plastic bag and rolling pin). Melt cream cheese for 15 seconds in a microwave to soften. Stir together crushed Oreos and cream cheese until blended smooth.

Carefully spread out Oreo truffle mixture on top of baked red velvet brownies. Use your hands to help press it down instead of spreading to avoid tearing the brownies. I then put this in my deep freeze to harden the Oreo layer prior to adding the top layer.

Melt chocolate candy bark (or chocolate chips) and pour over top Oreo truffle layer. Sprinkle with mini chocolate chips while still warm.

Let cool completely before cutting into squares, or freeze.

Tip
I keep all holiday treats, and regular treats for that matter, in my freezer.  That way, they are not staring at me in the face.  I actually tend to forget about them!  My plan for all the holiday treats we have posted this week is to serve them for company, as my husband and I are hosting Christmas Eve and NYE.  I saw a great idea on another food blog (which I can’t remember at the moment).  The author suggested putting zip lock baggies by your treat table, and encouraging guests to pack up a bag to bring home with them.  I am for SURE going to do this on NYE, to get the house cleaned out for the start of the New Year.  But for now, enjoy these treats that only come about but once a year!

XOXO - Katie


Wednesday, December 18, 2013

Sugar & Spice Cookies

These are another one of my favorite Christmas cookies!  They are a perfect blend of sugar and spice... hence the name. :)  Seriously though... if you don't have a gingersnap on your annual holiday cookie baking list, you should add these!

Servings:  Recipe will make 4 dozen
Size:  1 cookie
Points Plus: 2pp
Level of Difficulty:  Easy
Prep Time: 10 minutes
Bake Time:  6-8 minutes per batch
Rating: 5 stars – Excellent

Ingredient List:
¾ cup shortening
1 cup sugar
1 egg
¼ cup molasses
2 tsp. baking soda
1 tsp. cinnamon
¼ tsp. salt
½ tsp. ginger
2 cups flour
1 cup powdered sugar (to roll cookies in after baking)
Directions:
Preheat the oven to 375°. In a medium bowl, mix together the shortening, sugar, egg, and molasses.  Next, add in the baking soda, cinnamon, salt, ginger and 1 cup of flour; mix well.  Add the remaining cup of flour and mix until thoroughly combined.  Roll into walnut sized balls.  Bake for 6-8 minutes in a 375° oven.  Roll in powdered sugar while still warm.
Tip:
 Depending on how warm the cookies are when you roll in powdered sugar, you might need to roll your cookies in two different steps to make sure the sugar sticks to the warm cookies.  The ones in the picture above were rolled twice as a reference point.  However, if you prefer less sugar, only go through this step once!
XOXO Megan

Tuesday, December 17, 2013

FUDGE

FUDGE!  Did you ever know it was so easy to make??  Well, it is – HURRAY! (or not hurray for those of us trying to stay on track with our eating this holiday season) This fudge is the BOMB!  It is so simply, and can be cut into little squares for great portion (control)? It is rich so you don’t need a lot to satisfy your holiday craving.  This recipe was given to me by a dear friend – one who I send all my ridiculous food questions to. And she is always kind enough to answer my ridiculous food questions, and since she gives me amazing recipes such as this one, I always listen to her suggestions J.  She confessed that she found this recipe here. I added a bit of kosher salt (sea salt of flakes would work too) on top of this and I think it really was a tasty addition.  Also – I used a candy thermometer for this – but the timing came out almost exact.  After the sugar mixture is boiling, let it boil for 4 minutes and it is done. 

Servings: 48
Serving Size: 1 small piece*
Points Plus: 4pp
Prep Time: 10 minutes
Cook Time: 5 minutes
Level of Difficulty: Medium
Rating: 5 – Excellent!!!!!!!!!!!!!

Ingredients
3 cups sugar
3/4 cup butter or margarine
1 small can (5 oz.) evaporated milk (about 2/3 cup) (Do not use sweetened condensed milk.)
3 pkg.  (4 oz. each) BAKER'S Semi-Sweet Chocolate, chopped
1 jar  (7 oz.) JET-PUFFED Marshmallow Crème
1 tsp.  vanilla
Sea or Kosher Salt (optional)

Instructions
Line a 9-inch square pan with foil, with ends of foil extending over sides. Bring sugar, butter and evaporated milk to full rolling boil in 3-qt. saucepan on medium heat, stirring constantly. Mixture will grow so be sure you use a large enough pan. Cook about 4 min. or until candy thermometer reaches 234°F, stirring constantly. Remove from heat.
Add chocolate and marshmallow creme; stir until melted. Add vanilla and mix well.
Pour into prepared pan; spread to cover bottom of pan. Cool completely. Use foil handles to lift fudge from pan before cutting into squares.
Tip
You could top this fudge with a ton of different things. I love the sea salt + chocolate combo but you could use nuts, crushed candy canes or coconut. Adjust pp accordingly if adding additional toppings.
*If anyone would like me to figure out the PP on a larger piece – 1/36 of the pan, please let me know!

Monday, December 16, 2013

Peanut Butter Kisses

We wanted to share some of our FAVORITE Christmas cookies with you this week!  I know that Christmas cookies are not necessarily healthy or low in pp, BUT it is important for you to know how many pp you are eating if you do give in and have a cookie or two over the holiday season!

That said, this is one of my absolute favorite Christmas cookies!  These cookies have always topped the list when my family gets together to bake holiday cookies.  I’m sure you’ve had some variation of this recipe at some point, but like I said earlier, now you know how many pp each peanut butter kiss cookie is!!
Servings:  Recipe will make 3 dozen
Size:  1 cookie
Points Plus: 3pp
Level of Difficulty:  Easy
Prep Time: 10 minutes
Bake Time:  12-15 minutes
Rating: 5 stars – Excellent

Ingredient List:
4 Tbsp. butter
4 Tbsp. shortening
¾ cup peanut butter
½ cup sugar
½ cup brown sugar
1 ½ Tbsp. vegetable oil
1 egg
1 ½ cups flour
½ tsp. baking soda
Hershey kisses

Directions:
Preheat the oven to 350°. Lightly grease your cookie sheets.  In a medium bowl, cream butter, shortening, peanut butter and sugars until well mixed.  Stir in the oil and egg.  Add flour and baking soda.  Stir until just combined.  Roll into balls and then roll in sugar before baking.  Bake for 12-15 minutes.  Transfer to a wire cooling rack immediately after they come out of the oven and gently press a chocolate kiss in the middle of each cookie to flatten. 
Tip:
Make sure you un-wrap all your Hershey kisses and place in small bowl ahead of time!  Once your cookies are out of the oven you will want to work quickly to place a kiss in the middle of each cookie.
XOXO Megan

Friday, December 6, 2013

Raspberry Almond Bars


These bars are super easy to make and taste delcious!  The raspberry preserves helps you save time instead of making a raspberry sauce from scratch.  You could easily substitute in another fruit preserve instead if you prefer something else - strawberry, blueberry, blackberry etc!

Servings: 16
Size:  1 bar
Points Plus: 4pp
Level of Difficulty:  Easy
Prep Time: 10 minutes
Bake Time:  25-30 minutes
Rating: 5 stars – Excellent

Ingredient List:
1 cup flour
¾ cup oats
½ cup sugar
½ cup butter
½ tsp. almond extract
½ cup red raspberry preserves
1/3 cup almonds, sliced

Directions:
Preheat the oven to 350°. Lightly grease an 8x8 or 9x9 baking pan.  In a large bowl, mix together the flour, oats and sugar.  Add in the butter and cut with a pastry blender until the mixture resembles coarse crumbs.  Stir in the almond extract and mix well.  Reserve about 1 cup of the oat mixture.  Press the remaining mixture into the bottom of the pan, pressing down firmly to bind the crumbs together.  Spread the raspberry preserves over the top to about ½ inch from the edges of the pan.  Mix the sliced almonds with the reserved oat mixture and sprinkle on top of the preserves; press down gently.  Bake for 25 to 30 minutes or until the edges are golden brown.
Tip:
Not everyone owns a pastry blender!  That’s okay, this recipe can still be made without one.  Use a fork instead to cut the butter into the oat/flour/sugar mixture.  You have to keep working at it, but eventually the mixture will turn into crumbs!
XOXO Megan

Thursday, November 28, 2013

Maple-Pumpkin Pie with Salted-Pecan Brittle

Happy Thanksgiving everyone! We hope that you had a wonderful day of family, and that you were able to follow at least a FEW of the suggestions from yesterday's post! Here is a pie I made today that was hard, really really hard! I like a challenge but jeez is making candy hard. I had to redo the brittle at least twice, yikes! Anyways, the end result was great, once I actually read the direction. I am having some technical issues to follow this link from Better Homes & Gardens for this delish twist on pumpkin! Enjoy this indulgent sweet treat, because remember, staying on track with eating healthy means you can and should indulge sometime! Xoxo - Katie


Monday, November 18, 2013

Mini Pumpkin Cheesecakes

We are excited to bring you PUMPKIN WEEK!!!

Fall, autumn weather always gets me in the mood for something pumpkin.  You are in luck this week as Katie and I bring you lots of delicious pumpkin recipes to try out and add to your fall recipe list.   

I love finding new ways to bake with pumpkin.  This is a modification from my original cherry cheesecake recipe, but with pumpkin instead of cherry pie filling.  Enjoy!!
Servings: 20
Size: 1 mini cheesecake
Points Plus: 3pp
Level of Difficulty: Easy
Prep Time: 15 minutes
Cook Time: 25 minutes
Rating: 3 stars – Good 


Ingredient List:
Gingersnap cookies
2 8 oz pacakges of reduced fat cream cheese
¾ cup white sugar
1 cup pumpkin, canned
2 eggs
1 tsp. cinnamon
1 tsp. pumpkin pie spice
Pecan halves

Directions:
Preheat the oven to 350°.  Line a regular muffin tin with paper or tin liners. Place one gingersnap at the bottom of each liner; this will act as the ‘crust’ for your cheesecakes. Cream together the cream cheese, sugar first until fluffy.  Add in the pumpkin, mix well.  Next add the eggs, one at a time, and the cinnamon and pumpkin pie spice.  Fill each muffin liner with the cheesecake mixture, about ¾ full.  Bake for 20-24 minutes, or until a toothpick comes out clean.  Cool on a wire rack.  Top each mini cheesecake with a pecan half.  Refrigerate before serving.
Tip:
One piece of candy corn would also be a cute topping for each cheesecake.  Unfortunately, I made my batch of these the week after Halloween so all the shelves had been cleared of candy corn.  Pecan halves worked great as a substitution though!
XOXO Megan

Thursday, July 18, 2013

Island Rum Cake

Today is my birthday!!!  As I celebrate and indulge a bit (it is my birthday after all), here is a fun summer dessert for you to check out and maybe try out at the next time you have company?  This is a Pampered Chef recipe found here.  I made a few slight modifications, but it is basically the same recipe.  Enjoy!
Servings:  16
Size:  1/16 of cake
Points Plus: 10pp
Level of Difficulty:  Medium
Prep Time: 40 minutes
Cook Time:  15-18 minutes
Rating: 4 stars – Very good

Ingredient List:
Cake:
1 box of yellow cake mix
1/3 cup vegetable oil
1/3 cup water
1 egg
1 can crushed pineapple, in juice, undrained
½ cup sweetened flaked coconut

Filling & Fruit Topping:
1 package vanilla instant mudding mix, sugar-free
1 cup milk
2 cups thawed, frozen whipped topping
2 Tbsp. dark rum
1 kiwi, peeled and sliced
1 large mango, peeled and sliced
¼ cup toasted coconut

Syrup:
¼ cup brown sugar
2 Tbsp. dark rum
2 Tbsp. water
1 tsp. cinnamon

Directions:
Preheat the oven to 350°.  Use two torte pans (I used Pampered Chef’s version which are 10 ½ inches round) to make the cake in.  Spray each pan with cooking spray and place an 8 inch circle of parchment paper over the center of each pan.  In a large bowl, combine the cake mix, oil, water, egg and pineapple until well mixed.  Fold in the coconut flakes.  Divide the cake batter evenly between the two pans.  Bake for 15-18 minutes or until a toothpick comes out clean.  Let the cakes cool before you try and remove them from the pans; let cool on a wire cooling rack.  In a small saucepan, bring the brown sugar, dark rum, water and cinnamon to a boil over medium-high heat to make the syrup.  Whisk the mixture until the sugar is fully dissolved.  Cook for 1-2 minutes until the syrup is reduced to about ¼ cup; remove from heat.  Whisk the pudding mix and milk together to make the filling and add in 1 cup of whipped topping and the 2 Tbsp. rum.  Prep the kiwi and mango and cut into slices for the top of the cake.
Assemble the cake by starting with one torte cake on a round platter.  Brush the syrup topping over the top of the cake.  Using a cake decorating tool, pipe the filling mixture around the edge of the cake and spread evenly across the top of the cake.  Layer on the next cake layer and arrange the slices of mango and kiwi in the middle of the cake. Brush the remaining syrup on top of the fruit slices. Pipe around the edge of the top cake layer with the remaining filling and sprinkle the toasted coconut on top of the filling.
Tip:
A good cake decorating tool can help you to make impressive looking desserts!  I am partial to this version from Pampered Chef.
XOXO Megan

Thursday, July 4, 2013

Red, White & Blue-Berry Trifle

Happy 4th of July!!!  The 4th is one of my favorite holidays.  I absolutely love fireworks!  I also love summer BBQs and this is the perfect dessert to bring with you to a summer party.  This is a modified version of a berry, cake and pudding trifle.  I’ve adjusted the recipe to pack in extra berries and found substitues for the high pp value items like pound cake, cream, excess sugar, etc.

Servings:  8
Size:  1/8 of the trifle
Points Plus: 4pp
Level of Difficulty:  Easy
Prep Time: 25 minutes
Cook Time: n/a

Ingredient List:
Angel food cake (store-bought already baked version)
3 cups fresh strawberries, sliced
2 cups fresh blueberries
1 container Greek fat free yogurt, raspberry flavored
2 packages vanilla instant pudding mix, sugar-free
2 cup skim milk

Directions:
Wash and prepare the berries. In a large bowl, mix together with a whisk the milk, Greek yogurt and instant pudding mixes until the mixture has a thick consistency. In the bottom of your trifle bowl, start layering beginning with angel food cake.  Use 1/3 of the cake and tear off 1-2 inch pieces of cake and fill until the bottom of the bowl is covered.  Next use 1/3 of the pudding mixture, drop spoonfuls on top of the cake layer.  Finally, make the berry layer using 2/3 cup of blueberries and 1 cup of strawberries.  Repeat the 3 layers twice more resulting in 3 layers of each and ending with berries at the top of the trifle.  Refrigerate until you are ready to serve.

Tip:
The pudding mixture might be a little dull in color depending on what Greek yogurt you use.  I added about 10 drop of red food coloring to my mixture to bring out a richer pink color to make the pudding layer look more festive!

XOXO Megan

Thursday, May 30, 2013

Graudation Cupckaes

My brother graduated last weekend from St. Olaf and to help with the celebration my mom made these adorable graduation cupcakes.  She and I made a few prototypes to the get the cap and tassel just right, but by the end we had perfected it.  They were delicious too!
Servings:  24
Size:  1 cupcake
Points Plus: 8pp
Level of Difficulty:  Medium
Prep Time: 1 hour
Cook Time:  20 minutes
Rating: 4 stars – Very good

Ingredient List:
1 box of fudge cake mix
1 cup mini semi-sweet chocolate chips (set aside 1 Tbsp. for later)
Vanilla frosting
24 mini Reese’s peanut butter cups
24 Ghirardelli dark chocolate squares
24 M&Ms
One decorative tassel


Directions:
Prepare the fudge cake mix according to the directions on the box.  Add in the cup of mini chocolate chips into the cupcake batter.  Line a regular muffin tin with paper or tin liners. Fill each cupcake liner about 2/3 full.  You want your cupcakes to be on the small side since you will be adding frosting and the graduation cap.  Ideally the cupcakes will just come to the top of the cupcake liner once baked. Bake the cupcakes according to the box, probably about 18-20 minutes, depending on your oven.  Since you are making smaller cupcakes you should be able to get 24 cupcakes in total.  While the cupcakes are baking, in a small bowl, melt 1 Tbsp. of mini chocolate chips.  You will use this chocolate as a glue to attach and assemble the graduation cap. 
Once the cupcakes have cooled, frost each with a generous amount of frosting per cupcake.  To assemble the graduation cap, first put a small dab of chocolate glue on the top of an upside down mini Reese’s peanut butter cup (the larger surface area should be on the bottom), affix the Ghirardelli square on top.  The chocolate square should also be upside down with the flat, smooth side facing up.  Next, dab a very small amount of chocolate glue to the middle of the Ghirardelli square – attach a few strands of tassel (we found a decorate tassel and cut it apart to make smaller tassels), then add more chocolate to affix a single M&M on top. Serve at your party and hopefully people are impressed with your creativity! 
Warning:  Don’t EAT the tassel! J
Tip:
Creative cupcakes can be a really big hit for any sort of party – graduation, housewarming, holiday/seasonal, etc. We made these graduation cupcakes in St. Olaf colors – gold and black (well chocolate), but you could easily adapt to different school colors.
XOXO Megan
 

Thursday, May 16, 2013

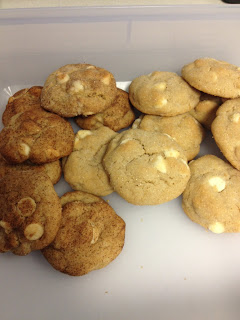
White Chocolate Snickerdoodle Pudding Cookies

It’s important to remember that it’s totally okay to indulge a little every once in a while!  I wouldn’t recommend you make these weekly by any means... especially because they are so good it will be hard to stop eating these cookies. :)  I made these to bring into work to share with my coworkers. They loved them!  This is one of my many recipes I have pinned on my ‘desserts’ board on Pinterest.  I was intrigued that these cookies had instant pudding mix as one of the ingredients.  Apparently pudding cookies have become really popular in the past year or so, who knew??
Yield:  4 dozen
Points Plus: 3 pp for one cookie 
Level of Difficulty:  Easy
Prep Time: 15 minutes
Cook Time:  10-12 minutues per batch
Rating: 4 stars – Very good

 Ingredient List:
1 cup unsalted butter
¾ cup brown sugar
¼ cup white sugar
1 3.4 oz package white chocolate instant pudding mix
2 large eggs
1 tsp. vanilla extract
2 ¼ cups all-purpose flour
1 tsp. baking soda
½ tsp. salt
2 cups white chocolate chips
1 tsp. cinnamon
1/3 cup cinnamon sugar (used to roll cookies in before baking)


Directions:
Preheat the oven to 350°.  Lightly spray cookie sheets with cooking spray.  Cream together the butter and brown and white sugars.  Add in the eggs, one at a time; make sure they are mixed well.  Next, add in the instant pudding mix, vanilla, flour, baking soda, salt and cinnamon.  Use a spatula to make sure you mix in all the dry ingredients thoroughly.  Fold in the 2 cups of white chocolate chips with the spatula.  Scoop out the cookies (about 3 Tbsp. per cookie), roll into a ball and then roll in the cinnamon sugar to evenly coat each cookie.  Place on the cookie sheets about 2 inches apart from each other.  Bake for 10-12 minutes, until slightly golden and just set in the middle. 
Note: I chose to make my first dozen cookies rolled in cinnamon sugar, but I did all others rolled in just white sugar.  I thought the cinnamon sugar was a little too overpowering for my taste.

Tip:
To keep your number of cookies you eat in check, plan to bring ALL of them into work to share and keep them at work in tupperware! That way you won't be tempted by having dozens of cookies at home AND your coworkers will appreciate your generosity. :)

XOXO Megan

Friday, April 19, 2013

Chocolate Stout Cake

Here is a good little recipe if you ever want people to think you are the most amazing baker of ALL. TIME. This cake is amazing, relatively easy for being 100% home made, and the bomb (did I already say it was good??)  Chocolate + Beer is an dynamic combo, especially stout.  Warning, this cake is dense but worth every bite. And even better, it can be made days ahead of time, it only gets better by sitting overnight(s). I followed this cake recipe, but used my own cream cheese/whipping cream frosting recipe (which deserves it's own post). The chocolate frosting that is included with the recipe is also amazing. When calculating the points plus value, I honestly could not bring myself to tell the truth (ahm, over 30pp per slice if you follow the recipe).   So, to practice portion control which is essential for a healthy lifestyle, I calculated them as cupcakes using just under 1/2 cup of batter for each.

Servings: 1 cupcake with 1 smearing (about a Tbsp.) chocolate frosting included in the recipe link above
Size: 1/48 of recipe
Course: Dessert
Points Plus: 8pp (only 5 pp without frosting)
Level of Difficulty: Moderate
Prep Time: 30 mins total including frosting
Cook Time: 18-22 mins
Rating:  5 - AMAZING

Tip:
Use a big bowl! There is enough batter for a three layer cake or 48 cupcakes.  FYI - that is a ton of batter!  Also, when adding sprinkles to frosting put them on right before serving so they don't bleed.  Also, feel free to read through the reviews on the website.  People have gotten very creative with this recipe, including adding a caramel to the middle and using a dusting of powdered sugar instead of frosting. 
Exhibit ONE - simmering beer + butter

Exhibit TWO - Delish cake!

LinkWithin

Related Posts Plugin for WordPress, Blogger...