Pages

Friday, July 5, 2013

Onion Dip

I saw this recipe on Siriously Delicious and immediately went to the store to buy the ingredients (for real!).  We are going camping for the weekend, and I thought this was the perfect appetizer/snack that could be paired with chips OR veggies.  It is so easy, only 3 ingredients, and does not taste 'healthy'.

Servings: 8
Size: 1/4 cup
Points Plus: 2
Level of Difficulty: Easy
Prep Time: 5 minutes
Cook Time: n/a

Ingredient List:
8oz fat free plain Greek yogurt
8 oz light sour cream
1 package onion soup mix (I used lipton)

Directions:
Mix and eat! Pop a lid on and go!

Tip: 
As mentioned above, you could pair this with veggies instead of chips for a light camping snack.  I have tomatoes, cucumbers, carrots and broccoli packed!

Thursday, July 4, 2013

Red, White & Blue-Berry Trifle

Happy 4th of July!!!  The 4th is one of my favorite holidays.  I absolutely love fireworks!  I also love summer BBQs and this is the perfect dessert to bring with you to a summer party.  This is a modified version of a berry, cake and pudding trifle.  I’ve adjusted the recipe to pack in extra berries and found substitues for the high pp value items like pound cake, cream, excess sugar, etc.

Servings:  8
Size:  1/8 of the trifle
Points Plus: 4pp
Level of Difficulty:  Easy
Prep Time: 25 minutes
Cook Time: n/a

Ingredient List:
Angel food cake (store-bought already baked version)
3 cups fresh strawberries, sliced
2 cups fresh blueberries
1 container Greek fat free yogurt, raspberry flavored
2 packages vanilla instant pudding mix, sugar-free
2 cup skim milk

Directions:
Wash and prepare the berries. In a large bowl, mix together with a whisk the milk, Greek yogurt and instant pudding mixes until the mixture has a thick consistency. In the bottom of your trifle bowl, start layering beginning with angel food cake.  Use 1/3 of the cake and tear off 1-2 inch pieces of cake and fill until the bottom of the bowl is covered.  Next use 1/3 of the pudding mixture, drop spoonfuls on top of the cake layer.  Finally, make the berry layer using 2/3 cup of blueberries and 1 cup of strawberries.  Repeat the 3 layers twice more resulting in 3 layers of each and ending with berries at the top of the trifle.  Refrigerate until you are ready to serve.

Tip:
The pudding mixture might be a little dull in color depending on what Greek yogurt you use.  I added about 10 drop of red food coloring to my mixture to bring out a richer pink color to make the pudding layer look more festive!

XOXO Megan

Wednesday, July 3, 2013

Mushroom Stroganoff

Do you ever just want to make homemade mushroom stroganoff but then you go online to Google a recipe and a million come up and you research and research and then finally give up because it seems too hard?  That exact sinareo has happened to me at LEAST 10 times (is that weird?).  I guess I find mushroom stroganoff subconsciously overwhelming.  Well don't fret, I have the recipe for you! This sauce is actually vegan, so no cheese or milk.  You would never believe it is so healthy!

Servings: 4
Size: 1/2 c.
Points Plus: 2pp (sauce only)
Level of Difficulty: Easy
Prep Time: 10 minutes
Cook Time: 30 minutes
Rating: 4 stars - Very Good

Ingredient List:
10 oz washed button mushrooms
1 yellow onion, chopped
1 T olive oil
1 T. Smart Balance Light butter
1 T. Flour
1 t. dried dill
1 t. dried parsley
1/2 c. fresh chives
1 c. soy milk
1/2 c. veggie stock
Salt & pepper to taste

Directions:
Add 1 T olive oil to large dutch oven followed by 1 T flour.  Mix until incorporated and cook for 4 minutes, siring frequently.  Add onion, stir and cook for 4 more minutes.  Add stock, soy milk, mushrooms, spices, salt and pepper to taste, and bring to a boil.  Add butter and chives, cover and cook for 30 minutes.  After 30 minutes taste and adjust salt and pepper.  Eat over noodles or veggies (I thought broccoli would be good).

Tip:
This recipe can EASILY be doubled or even tripled! Since it is so low in pp you could eat a cup of the sauce for no guilt!

XOXO - Katie


Tuesday, July 2, 2013

Supreme Pizza

Homemade pizza is one of Paul and my favorite meals to make together!  Actually this was the first meal we ever cooked together on our 4th date. J  We make a lot of different pizza varieties, but here is a recipe for a modified version of supreme.

Servings:  8
Size:  1 slice of pizza
Points Plus: 5pp
Level of Difficulty:  Easy
Prep Time: 15 minutes
Cook Time:  15-20 minutes
Rating: 4 stars – Very Good

Ingredient List:
1 can of Pillsbury refrigerated pizza dough, classic style crust
1 8 oz can pizza sauce (my favorite brand is Pastorelli)
1 Tbsp. dried oregano
16 slices of turkey pepperoni
1 cup green bell pepper, chopped
1 cup onion, chopped
1 cup shredded mozzarella, park-skim
1 cup shredded cheddar, reduced-fat

Directions:
Open the can of pizza dough and shape into a pizza shape, gently working the dough outward on a lightly greased pizza pan.  Evenly spread the can of pizza sauce on top of the crust, spread almost to the edges of the dough.  Sprinkle oregano over pizza sauce before putting in the oven to pre-bake the crust.  Cook the crust according to the directions on the package.  It works best to start cooking the crust with just the sauce and no toppings to result in a crispier pizza crust. Bake the un-topped pizza crust for 5-7 minutes.  While the crust is baking, prepare your onions and peppers.  Take the pizza out and top with cheese first, then your veggies and finally place the slices of turkey pepperoni on top.  Bake for an additional 5-10 minutes or until the crust is a light golden brown.

Tip:
At only 5pp per slice, don’t feel bad if you eat 2 slices of this supreme pizza.  I typically end up eating two slices when we make this!
XOXO Megan

Monday, July 1, 2013

Moroccan Couscous

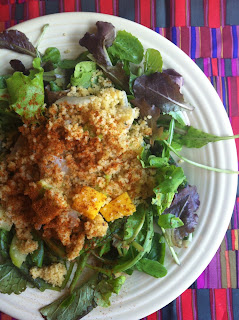
This is a tasty, somewhat spicy, veggie packed side.  In an attempt to utilize as many CSA veggies as possible as fast as possible, this recipe was inspired by this week's box.  Cubed squash, onion (my fav) and zucchini paired with some Moroccan inspired spices make this dish really delish!

Servings: 6
Size: 1 cup
Points Plus: 5pp
Level of Difficulty: Easy
Prep Time: 15 minutes
Cook Time: 30 minutes
Rating: 4 stars - Very Good


Ingredient List: 
2 cups peeled butternut squash, cubed
1 yellow onion, diced
1 large zucchini, cubed
1 T. olive oil
1 1/2 stock of your choice
1 T. Smart Balance light butter
1 t. McCormick - Moroccan Seasoning (mixture of cinnamon, cuman, coriander, ginger, cardamom, black pepper, white pepper, red pepper, paprika and turmeric)
1 cup uncooked couscous
4 scallions, white and green parts, chopped
Lettuce and/or spring mix, chopped
Salt and pepper to taste

Directions:
Preheat oven to 375.  Place quash, onion and zucchini on a rimmed sheet pan.  Drizzle with olive oil and salt and pepper to taste. Roast for 20 minutes, string after 10.  Increase oven temp to 400 degrees and roast for an additional 10 minutes.  While veggies are roasting heat stock in a large pan and add McCormick seasoning. Bring to a boil, turn off heat and let steep for 15 minutes.  After 15 minutes bring to a boil again, sprinkle couscous into stock mixture, stir, cover and let stand for 10 minutes.  When veggies are done remove lid from couscous and fluff with a fork.  Add veggies over couscous and toss.  Serve over copped lettuce and top with chopped scallions!

Tip:
For additional protein consider adding some roasted chicken.

XOXO - Katie

Friday, June 28, 2013

Greek Chopped Salad

A Greek salad is my go to salad – I never get sick of the combination of these ingredients!  Although chopped salads require extra prep since you have lots of veggies to wash and chop, I think they are well worth it and delicious.

Servings:  2
Size:  Main course salad
Points Plus: 6pp (does not include pp value for dressing)
Level of Difficulty:  Easy
Prep Time: 20 minutes
Cook Time:  n/a
Rating: 4 stars – Very good

Ingredient List:
Chopped romaine
1 cup cucumber, chopped
1 cup red bell pepper, chopped
½ cup celery, chopped
1 cup chickpeas, rinsed and drained
1 cup grape tomatoes, halved
½ cup crumbled feta, reduced-fat
12 Kalamata olives, halved

Directions:
Chop up hearts of romaine and plate out portions for two main course salads. Wash and chop up your other veggies (cucumber, bell pepper, celery and grape tomatoes), make sure they are chopped into smaller pieces since this is a chopped salad.  Open a can of chickpeas and rinse and drain.  Slice the olives in half.  Throw everything into a large bowl to mix thoroughly.  Add in the crumbled feta and serve with your favorite dressing – I would recommend some sort of vinaigrette.
 
XOXO Megan

Thursday, June 27, 2013

Ice Cream Cake

Today is my birthday ya'all!  In celebration, I have brought you a delicious ice cream cake recipe that you can eat for breakfast, lunch and/or dinner in this heat! (in moderation of course) It is loosely based after Dairy Queen's ice cream cake, and also loosely based of this recipe. I served this cake in 85 degree weather, 90% humidity AND outside.  Needless to say I didn't get to snap a photo.  But enjoy the one below from the Food Network that in totally actuality looks similar to mine! (for real)

Servings: 12
Size: 1/12 of cake
Points Plus: TBD
Level of Difficulty: Easy (for real it is, but you have to have patience)
Prep Time: 30 minutes
Chill Time: Overnight
Rating: 5 stars - Excellent!
Ingredient List:
1/2 qu. chocolate ice cream
1/2 qu. vanilla ice cream
4 oz. Mrs. Richardson's chocolate fudge
2 oz. Mrs. Richardson's caramel
1 sleeve Oreos (cream filled center removed)
2 c. heavy whipping cream
4 T. powdered sugar
Patience

Directions:
*This recipe would be 100 times easier if I had a deep freeze.  But I don't, so before doing anything I cleared off the largest spot possible in my side by side freezer. Also, this recipe takes a while (mostly waiting time).  I tried to split up the recipe so that it is easy to understand!
  1. Place a spring form pan in the freezer for about 15 minutes.  At the same time, remove and thaw vanilla ice cream. When pan is cold and ice cream is a little soft, spread 1/2 quart of the vanilla ice cream on the bottom of the spring pan.  Spread it around so that it looks like an ice cream 'cake' and return to freezer for 1 hour.  
  2. While the vanilla ice cream is re-freezing, remove the filling from the Oreos and discard.  Warning!!! Do not do this step when hungry.  You will:
    1. Eat too much of the plain cream filling
    2. Eat too many Oreos. 
  3. Pulse Oreos in your medium sized food processor until chunky, not powdery.  After 1 hour remove the cake from the freezer and sprinkle the Oreos over the vanilla layer.  Gently press them down with a spoon and return the cake to your freezer for 30 minutes.  
  4. After 30 minutes heat up your chocolate fudge so it is soupy.  Remove the cake from the freezer and pour the fudge over the cookies to coat.  Return cake to freezer for 30 minutes.  
  5. After 30 minutes warm up 2 oz of Mrs. Richardson's caramel sauce. Remove the cake from the freezer and drizzle the caramel over the fudge.  Return to freezer for 1 hour. 
  6. 45 minutes later remove your chocolate ice cream from the freezer and let soften.  15 minutes later remove cake from freezer and spread chocolate ice cream over caramel layer.  Return to freezer overnight.  Your spring pan should be full to the brim!  WOW that is a lot of in and out of the freezer, get what I mean about the deep freeze!
  7. ...the next day.  Whip 2 c. of heavy whipping cream and 4 T. of powdered sugar with an electric mixer until very stiff.  Set aside. 
  8. Fill your sink with 2 inches of hot water. Have a serving plate ready to go on your counter.  Gently dip your spring pan into the water for 5 seconds.  Seriously, any more and you will have a mess.  Bring your spring pan over to your plate and slowly open it, allowing the cake to drop onto the serving plate.  Return to the freezer for 1 hour.
  9. After 1 hour remove cake from freezer and frost with whipping cream.  Use your fancy cake decorating skills to pipe around the edges if you would like.  Return the cake to your freezer for 2 hours. This step is very important.  The whipping cream will sort of seal the cake, allowing for it to stand outside of a freezer for longer periods of time (meaning 10 minutes max, this cake does need to be kept in the freezer).  
  10. Remove from freezer a few minutes before serving.  Enjoy!
Tip:
You could also probably make this in a normal 9x13 inch pan.  I would recommend lining the pan with wax paper, making the cake, and then flipping it when done before frosting.  Delish!

Tipx2 - it would be fun to experiment with ice cream flavors with this! Or, if you feel like spending the case use two types of Ben & Jerry's!  2 pints per layer!

XOXO - Katie

LinkWithin

Related Posts Plugin for WordPress, Blogger...